How To Draw Simple Strokes

How to draw a family portrait with simple strokes

1. Composition – arrange the positions of the characters, 2. Draw a general picture of the family according to their personality, appearance, etc., 3. Draw the details – facial features, clothing, of course, the simple drawings must be drawn in the style of simple drawings, It can’t be too complicated 4. The background must be thought of and composed first, and then drawn. Be careful, don’t make it too clear, and highlight the subject (family). 5. Finally, if necessary, use a colored pen or black pen to outline the outline. You can color it if you want (there is no need to hook the background, it depends on your needs!) Done! Note: It is best not to color! It seems that there is no coloring for simple drawings. If you want, you can color it. If you don’t have a book, you can draw it according to the book. If you don’t have a book, search on Baidu Pictures ~ I will definitely have what you want. We don’t draw simple drawings very much anymore. Hehe, I’m going word by word. If you type it out, you should give me more points. Plagiarism is strictly prohibited! .

How to draw the texture of objects in sketch

Hello classmates, I am also an art lover. I personally have some immature understanding of sketching and share it with you. Let’s learn together~~ Sketching requires long-term copying and sketching, constant thinking and exploration, in order to master higher-level skills. Sketching Technique.

There is no easy way to create textured, vivid sketches. The basis of sketching is sketching tone. Mastering the tone well is the basis for good sketching. You need to practice more various tones.

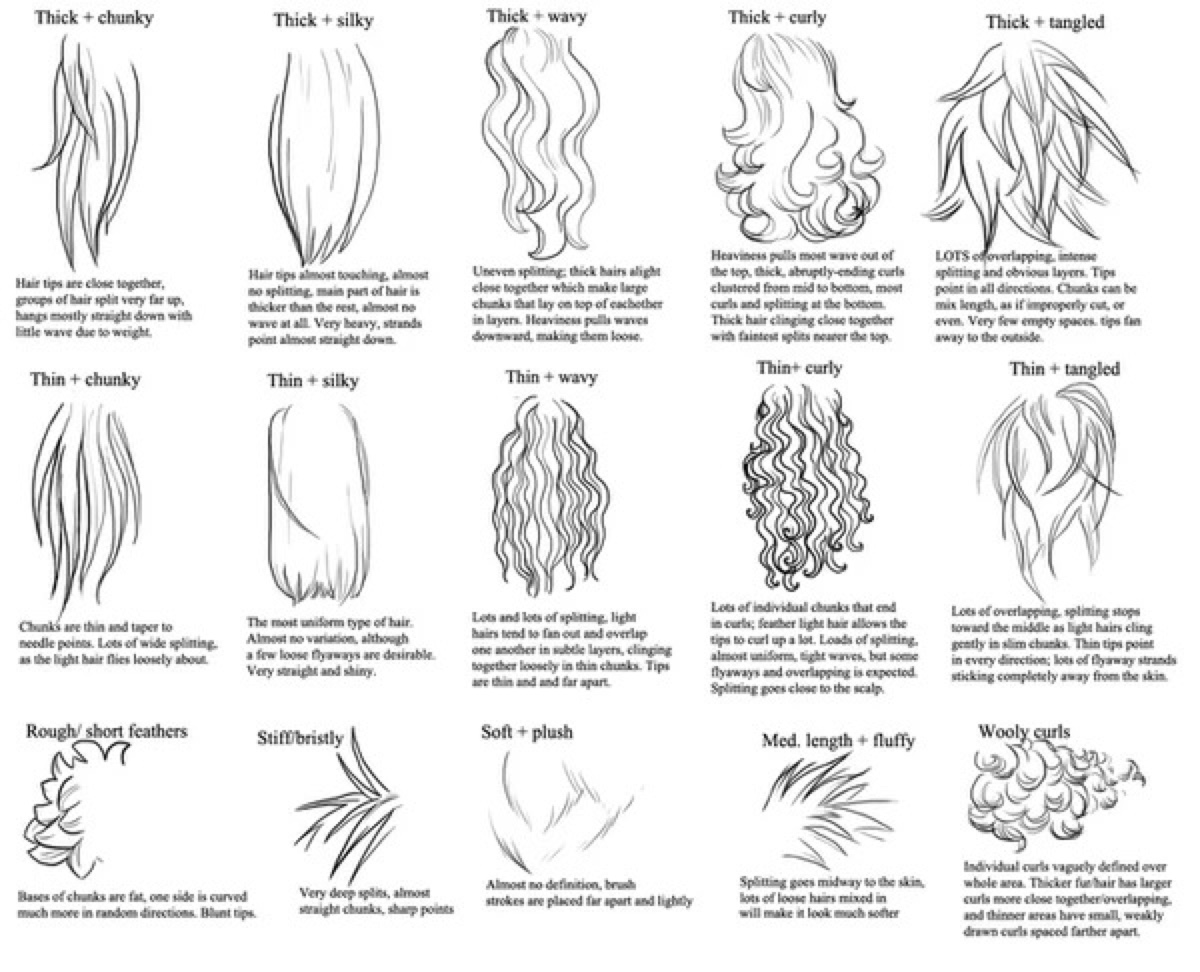
Various techniques of sketching can express different textures of objects. For example, the texture of hair can only be achieved by rubbing, using an eraser to enhance the shine, and using a knife to lift the hair. In fact, if the technique is good, it can be done with a piece of toilet paper, an eraser, and a pen. There are a few sentences that I can help you find: from complex to simple.

From shallow to deep. Step by step.

See with understanding, draw with understanding. See the whole and draw the whole.

Seeing in three dimensions, painting in three dimensions. Refined summary, artistic expression.

Hope to adopt! ! ~~.

How to draw a sketch

1. Before sketching, you should fully practice various lines.

Practice straight lines (the same as below for long horizontal lines and long vertical lines), flat painting (one line next to another, in blocks), arc lines (half-moon shape, in groups), loop line exercises (one continuous stroke, in groups), You also need to do group exercises of lines from shallow to deep and from deep to shallow. 2. Simple steps for sketching. Before drawing, you should observe and study the basic shape of the object, its direction of light reception, structural shape, and the three-dimensional effect formed. Then use straight lines to outline its general outline, and then determine the light reception (light) of the object according to the light source. Surface), side light (gray surface), shading (dark surface), three parts.

First, lay a uniform line on the dark surface and gray surface to temporarily leave the light-receiving surface empty. In this way, a large surface is used to express the object, and then the details in each block are also arranged according to the light receiving, side lighting, and shading. Divide into small pieces and facets to process. The reflective part should be left on the dark side, and the highlight part should be left on the light side to give it five tones.

We should also pay attention to the light and shade of small pieces and small surfaces, so that they obey the unified tone of the large surface, and the large surface must obey the whole. Finally, add connecting layers between these surfaces to make them natural and rounded until they show texture.

After the sketch is completed, the depicted objects must be coordinated and perfected. 3. Simple common sense about perspective in painting: 1. The farther away objects of equal size are, the smaller their shape becomes, so that they finally disappear at one point, which is called the vanishing point.

2. The further away the objects are at the same distance, the shorter the distance between them should be. 3. A line that is at the same height and parallel to the painter's eyes is called eye level.

4. Everything lower than the painter's eyes is below the eye level and above it. 5. Everything higher than the painter's eyes is above the eye level and below it.

6. Standing on a wide flat ground and looking forward, the boundary between heaven and earth in the distance is called the horizon. When looking straight up, the horizon coincides with the eye level, and the horizon is the eye level; when looking down, the horizon is above the eye level.

The horizon is an important basis for processing perspective graphics. 7. For any scene on the right of the painter, you can see the left side of it. 8. For any scene on the left of the painter, you can see the right side of it.

9. For any scenery above the eye level, the farther away it is, the lower its position will be on the drawing paper. 10. For any scene below the eye level, the farther away it is, the higher it will be on the drawing paper.

If you master the above knowledge of painting perspective and apply it to painting, you will not make common sense mistakes in painting, and the composition will be reasonable and in line with the beauty of visual appreciation. 4. When choosing a pencil, H means hard and B means soft.

6H is the hardest and 6B is the softest. For sketching, 3 pencils are usually enough.

Use HB pencil for outline, 2B pencil for outline, and 4B pencil for shading. In actual painting, as long as you understand the performance of pencils and can control the intensity of use, you don't have to stick to this, you can control it flexibly.

5. The basis of sketching is to draw more pencil sketches. You can start with a plaster geometric model.

Then, everything can be painted, such as porcelain, glass tea sets, cups and saucers, saucers and eggs, plaster head models, stationery and books, objects of various textures, indoor scenes, etc. From single to combined, from simple to complex.

Gradually, you can try character sketch copying and sketching. Master the skill of using a brush by learning calligraphy and line drawing (that is, works expressed with a brush).

6. You must enter a state of selflessness when painting, and do not rush for success. Even if you only paint one painting a day, as long as you devote yourself to painting, you will get unexpected results.

You should often copy the sketch works of famous artists and read more books such as "Knowledge of Painting Perspective" and "How to Draw Sketch". Only by studying painting skills diligently and continuously can you succeed.

How to draw a simple little boy

How to draw a little boy in simple strokes: The little boy below has a big head.

The body is also in the growth and development period, and is almost 3-5 heads long. At this time, little boys are always full of curiosity about the outside world, and especially like to ask why.

And they are also naughty but kind at the same time. Therefore, when drawing the facial features of a little boy, you can use a slightly open mouth to express curiosity about the outside world, and watery eyes (you can use a blackened oval to erase a corner to express it) to express their kindness. You can also use Naughty faces show off their mischievous nature.

After roughly grasping the characteristics of all the little boys, it is time to start observing the characteristics of the object to be depicted. When selecting painting objects, the concept of the picture should be determined based on different objects.

Such as a picture of a young primary school student who looks very happy after just discovering a bug, or a kindergarten child who looks helpless because he broke a vase. Also pay attention to the little boy's clothing.

Only by mastering these can you express the little girl better. The layout of the picture is the same as that of the little girl. It is best to draw it in the middle and upper part of the picture.

This avoids the screen from sinking due to being too far down. After determining the layout of the picture, you can start painting.

Appreciation of the little boy's simple drawings: Little boy's simple drawing 1 Little boy's simple drawing 2 Little boy's simple drawing 3 Little boy's simple drawing 4 Little boy's simple drawing 5 Little boy's simple drawing 6 Little boy's simple drawing 7.

Basic steps and drawing methods of sketching

Sketch painting mainly uses a single color to express the structure of objects, the relationship between light and dark, etc.

First of all, any painting or any kind of painting needs to consider the composition. To put it simply: the content you draw needs to have a reasonable position on the drawing paper and be comfortable to look at – the principle is to rather go up than down, and to the left and right. The golden section shall prevail. However, when drawing characters, you need to leave a large space in front of the eyes, and the specific situation will be treated on a case-by-case basis.

Secondly, start the shape. Forming refers to using lines to express the physical structure of the drawn content.

The principle is to start from the simple to the subtle and slowly go deeper. Third, raise the tone.

The so-called tone is one of the main ways to express the three-dimensional sense of an object. First of all, we must pay attention to the relationship between black, white and gray tones.

According to the angle of light illumination, the painted object must have multiple layers of light and dark relationships, and grasp the highlights, gray surfaces, light and dark boundary lines, dark surfaces, reflections, shadows and other elements produced by light illumination. If you grasp the above three points and connect them over time, you will definitely achieve something.

Wish you success! .

How to draw a great gesture with simple strokes

1. First, let’s draw the outline of the thumb, paying attention to the arc when drawing.

2. Then draw the remaining four curved fingers. Pay attention to the layering of the four fingers. 3. Then draw the outline of the hand. You can use a ruler when drawing.

4. Draw the sleeves of the clothes with the stick gesture. The specific pattern is as shown below. Extended information: Stick is a simple, intuitive, vivid, vivid and simple form of painting that uses simple dots, lines, paintings and other symbols to express the basic characteristics of objects.

Its outstanding feature is that the strokes are simple, lively and lively. It only takes the shape and ignores the details. It is simple, practical and easy to learn. It is particularly useful for teaching.

Drawing simple drawings does not require advanced painting skills, it can be mastered with just a little practice. And it is very convenient to use. You can have it at your fingertips anytime, anywhere, and draw as you need.

Children's Drawing Games.doc

Many parents pay attention to the painting of children aged 15 to 18. Parents know that painting helps babies use their imagination, enhance observation and attention abilities, and that hands-on painting can also exercise arm muscles and improve hand-eye coordination. So, what are the popular children’s games? "The Little Fish Blowing Bubbles": "The Little Fish Blowing Bubbles" is a children's intellectual game with novel design and interesting content. It can train the baby's hand-eye coordination, develop fine hand movements, and develop children's imagination. Strength and creativity, it is a good game to exercise your baby's vision and spatial intelligence, and stimulate your baby's painting ability. Prepare watercolor pens, drawing paper, old magazines or books, scissors, and glue. How to play: 1. Mom cuts out some colorful pictures of small fish, shrimps and turtles from old magazines and books and pastes them under the white drawing paper. 2. The mother takes the drawing paper and tells the baby a story to arouse the baby's interest in drawing. For example: "This is a very fun underwater world. There are many cute little fish, shrimps, and little turtles in it. Let's count them. There are a total of one little fish, 2 little shrimps, and 1 little turtle. On one side of the little fish As he swam, he spit out a bunch of small bubbles from his mouth. How beautiful it is!" Mom said while drawing a few small circles around the mouth of a small fish. 3. While listening to the story, the baby picks out his favorite watercolor pen and paints it on the drawing paper. He draws horizontal lines, vertical lines, large circles, and small circles on the paper at will. 4. After the baby has filled up the drawing paper, the mother holds the baby in front of her, holding the drawing paper in one hand and a pen in the other, observing and guiding according to the baby's lines.The mother will say with joy: "Look, how well our baby draws. These horizontal wavy lines are sea water, these crooked vertical lines are water plants, and the little bubbles the baby drew just came from The fish spits it out from its mouth, it's so beautiful." The mother said while using a dark pen to mark the baby's

Traffic Safety Children's Paintings Pictures

Traffic safety has a very close relationship with us, it is like our friend. He stays by our side day and night, educating us and admonishing us.

Life is precious. We only have one life in our life. We should cherish life. Paying attention to traffic safety is also part of cherishing life. There are too many people dying due to traffic accidents now. Isn’t it too unfair that they didn’t die?

We should keep traffic safety in mind. More importantly, you need to know the common sense of traffic safety: first, pedestrians must walk in crosswalks, and walk on the right when there is no sidewalk; when crossing the road, you must use a crosswalk; when passing a crosswalk controlled by a traffic signal, you must abide by the signal regulations; when passing a crosswalk without a traffic signal, At controlled crosswalks, pay attention to the traffic of vehicles. Chasing and running are not allowed. You are not allowed to climb the guardrails and isolation fences on the side of the road and in the middle of the road. You are not allowed to pick up cars, chase cars, forcibly block cars or throw objects on the road.

As long as you keep these traffic safety features in mind, it will be your best friend. It will always protect you and bring you happiness.

Traffic safety, my friend.

[Picture collection of children’s paintings on traffic safety] Related articles:

A collection of pictures of children's house paintings 03-30

A complete collection of children's animal drawings-paintings 06-28

A collection of pictures of children's paintings of lotus 06-14

Summer pictures and paintings – children's painting collection 06-12

Children's paintings for Father's Day-picture collection 06-13

Summer Pictures Children's Paintings-Collection of Paintings 06-06

A complete collection of children's paintings on traffic safety 06-02

Summer children's painting works-children's painting pictures 07-25

A collection of children's paintings of summer pictures – Appreciation of paintings 06-07

A collection of pictures of children's paintings of Dragon Boat Festival – Appreciation of paintings 05-17

Nail Beauty Methods Painted Nail Patterns

How to Whiten Nails. Stained nails are unsightly and often embarrassing. Luckily, when your nails start to look a little discolored, here are some fairly simple ways to whiten your nails.

Nail Beauty Methods Painted Nail Patterns

Nail Beauty Methods

How can a person who has never worn nail polish apply nail polish without making a fool of himself? And applying nail polish can damage your nails, so how can you protect your nails? Making nail polish less likely to fall off is a must for “manicurists”!

1. You need to be quick when applying nail polish. First, dip a small brush into the nail polish, but not too much. It is best to gently wipe it on the mouth of the bottle and adjust the brush smoothly. Start in the middle of the nail root and apply toward the tip of the nail. Apply the second and third strokes from both sides of the nail root toward the nail tip.

After the first coat of nail polish is completely dry, apply it again as above. If you apply the second coat of nail polish without waiting for the first coat to be smooth, the nail polish will become uneven after forming a film.

Finally, apply a fixing oil on the surface of the nail polish to prevent the nail polish from fading, cracking or being scratched and making the gloss last longer.

If you apply setting oil every other day, your nails will stay shiny for a long time.

2. If you want to make your fingers look slender, you don’t have to follow the fashionable nail trend. You might as well trim your nails into a drop shape, which will give you a slender effect. But if it is too long or too sharp, it will break easily.

3. Do not do housework immediately after applying nail polish, but wait 60 minutes before doing any work again. It's best not to wash your hands in hot water before, as this can tarnish the nail polish.

4. If you want to make your fingers look more natural or have a healthy luster, you can choose a middle red, light pink or translucent nail polish that is close to your skin color to achieve this texture.

Women who want their jade fingers to look fairer may wish to choose bright rose or red nail polish to make their fingers look more delicate and white.

5. No matter what kind of nail polish, as long as it is applied for a long time, the nails will no longer breathe and will easily turn yellow. To restore the vitality of your nails, in addition to avoiding the use of low-quality nail polish, you should not apply nail polish every one or two days to give your nails time to breathe. You can also apply a layer of nail polish before applying nail polish and after removing it. Maintenance oil. This product looks like transparent nail polish, which can protect nails from damage and yellowing. The application method is the same as applying nail polish.

6. Applying nail polish several times a day or washing it off and applying it again will cause the nails to form "secondary nails", which is also very undesirable.

painted nails

[Nail painting] First, after cleaning the nail surface, use white and pink to paint an arrow-shaped manicure shape on the front of the nail (as shown in the picture). Use pink for the ring finger, and white for the rest of the fingers.

[Nail Painting] After painting, apply a layer of transparent nail polish to brighten it up. After it dries, use a nail art brush dipped in bright gold nail polish to draw the shape of the collar on the newly painted manicure (as shown in the picture). You can draw it into a round collar or square collar according to your preference!

[Nail Painting] Pay attention to the size and symmetry of the collar shape on the left and right sides to make this manicure more beautiful.

[Nail Painting] Only by trimming your nails into a square shape can you look more like a shirt! Then draw the collar pattern on all the nails (as shown in the picture)

[Nail Painting] Finally, dip two golden beads under the collar at equal distances. This way the overall manicure look will look more like a shirt!

Finally, after all the nail polish is dry, apply a layer of polish to the entire nail surface to make the look more transparent and natural, and you're done! Isn’t it super cute? If you like it, hurry up and try it yourself!

This is the content related to "Nail Beauty Methods of Painting Nail Patterns" introduced to you by the editor of this website. I hope it will be helpful to you. In addition, if you need to know more relevant knowledge, you can continue reading the articles we recommend for you.

Magnetic Drawing Board Manufacturer, Magnetic Drawing Board, Hongshun Technology Is Worth Recommending

Pan'an County Hongshun Craft Factory specializes in the production and sales of [Children's Drawing Boards], [Office Stationery], [Children's Easels], [Message Boards] and other products. You can contact the phone number on the picture for ordering consultation!

Beware of the "Seven Misunderstandings"!Give children appropriate art education

Overemphasis on painting skills and underestimation of imagination

Some parents are upset because their children's drawings are not round, square, or straight. This actually means that they fail to take into account the physical and mental characteristics of their children and ignore the cultivation of their own needs and interests.

There is actually no skill in children's painting. It is the accumulation and summary of experience.

Simply teaching children drawing skills will scare them away. Children never doubt their skills when drawing. There is nothing they cannot or dare not draw.

No matter how complex the characters or scenes are, they will become concise as long as they pass through their minds; no matter how simple things are, they will become rich as long as they are drawn by their hands. This is children's drawing.

Einstein said: "Imagination is more important than knowledge, because knowledge is limited, but imagination summarizes everything in the world, promotes progress and is the source of the evolution of knowledge."

Early childhood is the stage when bold imagination begins to form. At this stage, brain thinking patterns are easy to form and can be maintained permanently, so it is crucial to cultivate children's imagination in early childhood art classes.

Hongshun reminds you that children's interest in painting should be cultivated from an early age. Painting has a great impact on children. With magnetic drawing boards, it is important to choose a suitable children's drawing board for children to write and draw. The [Children's Drawing Boards] produced by Hongshun are all made of pine wood, and there are special instructions to teach you step by step how to install and use them, which is very convenient.

Pan'an County Hongshun Craft Factory specializes in the production and sales of [Children's Drawing Boards], [Office Stationery], [Children's Easels], [Message Boards] and other products. You can contact the phone number on the picture for ordering consultation!

At what age is it better for children to start learning to draw?

1. When choosing a children's art class, first of all, it is very important to understand the teaching philosophy of the teacher who teaches the children's art class. An excellent art teacher will definitely not teach children to draw according to their own needs. Instead, they will know how to interpret children, be patient, be good at discovering children's strengths and sensitive points, help children overcome difficulties and develop their potential, and make children more independent. Take the initiative to explore.

2. It is to inspect the class environment. Spacious and bright are the minimum requirements for a studio. It is also an important factor that one teacher does not have to deal with too many students at the same time. It is hard for me to imagine how a teacher who teaches more than 20 children at the same time can teach students in accordance with their aptitude. Art pursues individuality and diversity, as well as children’s creative ability and broad thinking.

Hongshun reminds you that children's interest in painting should be cultivated from an early age. Painting has a great impact on children. It is important to choose a suitable children's drawing board for children to write and draw. The [Children's Drawing Boards] produced by Hongshun are all made of pine wood, and there are special instructions to teach you step by step how to install and use them, which is very convenient.

Magnetic drawing board manufacturer, magnetic drawing board, Hongshun Craft is recommended to be provided by Pan'an County Hongshun Craft Factory. Magnetic drawing board manufacturer, magnetic drawing board, Hongshun Craft is worth recommending. It is newly upgraded and launched by Pan'an County Hongshun Craft Factory () this year. The above pictures are for reference only. Please call the contact number on this page or the picture to obtain new information. Contact person: Manager Li.

Cute Q-version Figure Drawing Tutorial! Teach You How To Turn A Normal-proportioned Character Into A Q-version Character!

How to draw cute Q version characters? How to learn to draw?Presumably these are questions that beginners of painting often think about. They just don’t know how to learn painting well and then paint what they want to paint.

So today, Civet Cat Classroom has collected and sorted out some information on how to turn normal-proportioned characters into Q-version characters! The tutorial is very simple, come and take a look:

The following will explain how to draw Q-version figures with 2 and 3 heads and bodies!

First, break down and organize the elements of the character to determine the head and body.

・Color: Blue based on yellow and white

・Hairstyle: Short hair to below chin

・Face shape: double eyes, thick eyebrows

・ Clothing: 7-piece sleeve collar for tops and skirts only, knee-high boots

Figure painting q-printing_Character q-printing method_Simple q-printing method of drawing people

・ Essentials and decorations to bring:

Summarize the elements one by one like this.

Information about faces, in particular, becomes very important in showing character characteristics.

If it is eyes, there are hanging eyes, droopy eyes, eyeliner, small eyes, etc. If there are characteristic eyelashes, such as lower eyelashes and straight eyelashes, please describe the Q version of the character carefully.

Tips for transforming characters into 2.3 bodies

Figure painting q-printing method_Figure painting q-printing_Simple q-printing method of painting people

On the basis of the above, the actual implementation of deformation (deformation) determines your own head and body.

It is understood that the figure before transformation had about five heads and body.

Please refer to this picture to add balance to the mini character shape. Two heads and bodies are used as the main points of the depiction, such as: the ratio of head: torso: feet is 1:0.5:0.5, and the three-headed body. If this is the case, the ratio of head: torso: feet is 1:1:1. .

Also, let’s introduce the trick to be aware of the deformation of each body part. Especially in the case of a 2-headed body, I realize that a baby-like figure will look cute.

To transform into a Q-version character, let’s draw a character with two heads.

Here we will depict a two-headed mini character.

Character q-printing method_Simple q-printing method How to draw characters_Q prints of character paintings

When engaging in transformation, it is particularly important to exaggerate the parts that are characteristic of the character.

Do not shrink too much around the abdomen and joints, and give the impression of a baby-like body shape.

Be careful not to mess up your chin too, it will be better this way.

When drawing a face, don't draw it in the center of the face, but draw it slightly downward.

Figure painting q-printing method_Figure painting q-printing_Simple q-printing method of painting people

It is common for people who are not good at deformation to be too rigid in their human body structure and the deformation cannot fully occur.

When transforming, the human body structure should be ignored to a certain extent. When deformed, the shoulder width is squeezed as much as possible, giving people the feeling of a small person.

The hands are also described very small to give the impression of being petite.

In addition, be careful not to draw the lines of such clothes too thin, but have a conspicuous thickness.

Be generally aware of reducing lines, try to reduce wrinkles in clothes, lines in hair.

Figure painting q-printing_Character q-printing method_Simple q-printing method of drawing people

Draw a three-headed character

Here we explain the three-headed body.

The head is much longer than the two ends. Also, the body will be slightly more constricted than the two bodies.

However, when depicting male deformation, be careful not to excessively constrict the neck.

If the arms and legs are drawn thinner and longer than the two-headed body, the balance will be better.

The outlines of the clothes on the 2nd body are mostly gentle curves, but the drawing area of ​​the 3rd body is very large, so it would be better to add some wrinkles.

In this way, the three-headed Q-version character is completed!

By the way, I recommend that you search for: Civet Classroom, or open your phone and search in the add friend box: Civet Classroom, follow it with one click, and study without worries! There are a lot of illustration courses on it. Every day the teacher will guide you on your illustration techniques online, so that your laziness can’t escape. The key points are, it’s free, it’s really free, it’s really free!

How To Draw The Hair Of Q Version Characters? Tutorial On How To Draw Anime Character Hair!

How to draw the hair of Q version characters? How to draw the hair of Q version characters well? What are the techniques for drawing the hair of Q-version characters well? Presumably these questions are more troublesome for beginners of painting, so how can you draw the hair of anime Q version characters well? Today, the teacher of Civet Classroom collected and sorted out on the Internet how to draw the hair of Q version characters? Tutorial on how to draw anime character hair! The tutorial is very simple, come and take a look:

In the cute Q-version comics, hairstyle is an important element that distinguishes the characteristics of the Q-version characters. Therefore, when designing and drawing Q-version characters, the key to drawing a Q-version character well is to make the character's hairstyle suitable for his personality and have an impressive hairstyle.

As shown below:

1. The hair drawing of the Q version and the ordinary head and body is drawn according to the circular arc of the character's head. Generally, there is an appropriate amount of bangs in the front.

2. The hair of Q-version characters is generally simplified, and the hair groups are relatively simple and general.

Character painting q version_Simple q version character drawing method_Character simple drawing q version simple

Draw hair starting from the hair curler

As shown below:

1. Most people’s hair whorls are located at the back of the head. 2. The character’s hair grows with the hair whorl as the center.

3. Parts of the hair may flow messily.

Simple character drawing q version simple_Character painting q version_Simple q version character drawing method

Q-version character hairstyles with different hair volumes

How to draw hairstyle

1. Draw the general outline of the hair. You can first use blocks to express the thickness and texture of the hair.

2. Draw the basic hair shape and general trend of the hair according to the outline.

3. Further add hair groups and pay attention to the consistency of the hair trend.

Simple q version character drawing method _Character drawing q version simple_Character painting q version

4. Further draw the trend of bangs and hair, and continue to group the hair.

5. Draw the details of the hair and pay attention to the undulating texture of the hair.

6. Draw the shadow of the hair and remove the structural lines of the head.

The four elements of drawing hair

Character painting q version_Character simple drawing q version simple_Simple q version character drawing method

Example display-colorful Q-version character heads

The above content is the high-quality tutorials collected and shared by Lingmao Classroom from the Internet. It mainly teaches you how to draw anime character hair! The tutorial is super practical. I believe this tutorial will definitely be helpful to everyone. Hurry up and save it for practice~

If you are interested in our self-study program

Welcome to join our free public welfare painting exchange community group:

Character painting q version_Simple q version character drawing method_Character simple drawing q version simple

There, we will have a lot of painting tutorials and material reference resources

There are also regular free live classes

Teachers will guide you online every day on your painting techniques

Help you open the door to painting improvement

Everyone can speak freely in the group

Enjoy painting in a relaxed communication!

How To Draw Q Version Characters? Tutorial On How To Draw Anime Q Version Characters!

​​How to draw Q version characters? How to draw Q-version characters well? What are the techniques for drawing Q-version characters well? Presumably these questions are more troublesome for beginners of painting, so how can we draw anime Q-version characters well? Today, the teacher of Lingmao Classroom collected and sorted out on the Internet how to draw Q version characters? Tutorial on how to draw anime Q version characters! The tutorial is very simple, come and take a look:

Q-version cartoon characters have conquered the hearts of many young people with their cute and humorous images. Q-version character paintings are different from other art forms and have their own unique charm.

How to draw the body of a character in Q version

The 4-head and body Q-version characters are basically equivalent to the size of a child with a normal head-to-body ratio, but it can still be seen from their expressions, movements, and clothing that they are Q-version characters.

4. The body shape of the character can be drawn more realistically. The knees are between the waist and 1/2 of the soles of the feet. The calves are longer than the thighs to reflect the slenderness of the characters.

Various Q-version characters with 4 heads and bodies

3 heads and body Q version characters

The proportion of the head, torso and legs of the 3-headed figure is balanced, generally 1:1:1. This kind of head and body is generally used to express teenage Q version characters.

Figure painting q version_Simple method of drawing q version figures_Figure painting q prints

3-headed characters have the best body balance, with the ratio of head, torso, and legs approximately 1:1:1. The legs start to get longer.

Various Q-version characters with three heads and bodies

2 heads and body Q version characters

2. Head and body: The head and body of the Q-version character are roughly the same length. When drawing, pay attention to shrinking the entire body. The width of the head must be greater than the width of the shoulders to achieve coordination.

When creating a cute Q-version character with two heads and a body, in addition to the characteristics of a big head and a small body, you should also pay attention to the short length of the legs, which is about 1/3 of the body, and the arms are even longer than the legs.

Various Q-version characters with 2 heads and bodies

Figure painting q version_Simple method of drawing q version figures_Figure painting q prints

How to draw hair of characters in Q version

In comics of the same style, hairstyle is an important element that distinguishes characters. When designing and drawing characters, having a hairstyle that suits their personality and an impressive hairstyle is the key to drawing a good Q-version character.

As shown below:

1. The hair drawing of the Q version and the ordinary head and body are drawn according to the circular arc of the character's head. Generally, there is an appropriate amount of bangs in the front.

2. The hair of characters in the Q version is generally simplified, and the hair groups are relatively simple and general.

Draw hair starting from the hair curler

As shown below:

Figure painting q version_Figure painting q prints_Simple How to draw q-version characters

1. Most people’s hair whorls are located at the back of the head.

2. The character’s hair grows with the hair whorl as the center.

3. Parts of the hair can flow messily.

Q-version character hairstyles with different hair volumes

How to draw hairstyle

1. Draw the general outline of the hair. You can first use blocks to express the thickness and texture of the hair.

2. Draw the basic hair shape and the general trend of the hair according to the outline.

Simple how to draw q-version characters_Character painting q-version_Character painting q-prints

3. Further add hair groups and pay attention to the consistency of the hair trend.

4. Further draw the direction of the bangs and hair, and continue to group the hair.

5. Draw the details of the hair and pay attention to the undulations of the hair texture.

6. Draw the shadow of the hair and remove the structural lines of the head.

The four elements of drawing hair

Example display – colorful Q-version character heads

Figure painting q-prints_Character painting q-version_Simple how to draw q-version characters

The above content is the high-quality tutorials collected and shared by Lingmao Classroom from the Internet. It is mainly a tutorial on how to draw anime Q version characters! The tutorial is super practical. I believe this tutorial will definitely be helpful to everyone. Hurry up and save it for practice~

If you are interested in our self-study program

Welcome to join our free public welfare painting exchange community group:

There, we will have a lot of painting tutorials and material reference resources

There are also regular free live classes

Teachers will guide you online every day on your painting techniques

Help you open the door to painting improvement

Everyone can speak freely in the group

Enjoy painting in a relaxed communication!

Statement: The material comes from the Internet, and the copyright belongs to the original work. It is only for learning and exchange, not for commercial use.​​​​

Crazy Call For Idols, "Painters Battle" Team Invitational Competition Starts Today

To cheer crazily for idols, the "Painter Battle" team invitational competition starts today. On March 16th, the "Cute Cup" team invitational competition of "Painter Battle" will start happily. This time, four teams of cute girls will participate in the competition. Come and cheer for your favorite girls!!

Who says women are inferior to men

Mobile gaming is developing rapidly, and more and more players are signing up to play Painter every day. As the player base expands, so does the number of female players, and there are more women's games and leagues. However, the attitude towards female players in competitive games has become deeply ingrained, resulting in girls’ gaming skills often being complained about. In fact, there are many girls who are very good at playing games. We should treat them equally and enjoy the happiness that games bring us.

There are so many cute girls painting

In the just-concluded "Cute Painter" voting event, "Cai Cai is very good" won the first place. She is a temperamental lady with both good looks and skills. She can stand alone in her personality, gentle and slightly domineering. , if you mess with such a girl in the game, you will probably lose miserably.

Cute girl competition is on fire

Starting from 20:00 on the evening of March 16, the preliminaries will adopt a single round-robin system. Four groups of cute girls will compete against each other in pairs. The top two teams in the preliminaries will automatically enter the finals. The final adopts a best-of-three-game system, and the first to win two games will win the championship. The winning team can receive the "Cute Girl Gift Pack" and "Goddess Gift Pack" and display the winning girl's tag in the "Popular Goddess" section of the official website.

Magic Sound Circle’s light competitive mobile game “Painter Battle” is a magical game. The gameplay of IO Enclosure is novel and exciting, with simple rules and fierce confrontation. It seeks the most direct and simple game fun through personal skills in the rhythm of music. The more you play with massive magical music, the more exciting it becomes. Multi-player teams can join the black game to enjoy a happy time. Get started in one round, poisoned in three rounds. Follow the official website, WeChat and other official consultations to learn about the latest activities. Games, making money, and looking at beautiful women are all indispensable! Tonight, the goddess is fighting!

Related:

The magic Douyin gift pack of "Painter Battle" on the No.1 mobile game network is now available for redemption

Let's set a new milestone together. The first monthly competition of "Painter Battle" will start tomorrow

No.1 mobile game network new game welfare group: Play games with like-minded friends. New games must have activation codes, new servers must have gift packages, in order to meet the various needs of players. We look forward to your joining!

Want to know more about new games>>>Enter the new game channel of the first mobile game website

Want to know the latest server opening information>>>Enter the first mobile game network server opening channel

Want to get the latest game gift pack>>>Enter the first mobile game network gift pack channel

How To Draw The Original Painting? Original Painting Step-by-step Tutorial!

How to draw the original painting? Original painting step-by-step tutorial! The original painting step-by-step tutorial refers to the step-by-step tutorial for original painting technology. It is a technical learning method that can help you quickly master the original painting technology. The original painting step-by-step tutorial can help you learn original painting techniques and master the steps of original painting production, so as to better complete original painting works.

Recommended online platforms for learning original painting:

1. Light class: Light class is a very popular board painting learning platform in China. Its main courses include Japanese illustrations, game original paintings, ancient illustrations, animation comics, etc. The special devil painting training class of the light class is popular on the Internet, and you can advance through the level + devil inspector The model is very popular among students and attracts a large number of netizens to challenge their "devil training" and "devil inspection" services!

2. Touch Station: There are a large number of painters on Touch Station, and more than 10,000 works are updated every day. It is a platform for painters to receive orders and build their popularity. It is also a website for painting enthusiasts to look at pictures, find pictures, and learn to paint!

3. Yangke.com: A free painting learning website, free online painting courses, providing a free learning platform for painting enthusiasts.

The original painting step-by-step tutorial can help you learn original painting techniques and master the steps of original painting production, so as to better complete original painting works. The original painting step tutorial can help you understand the basic knowledge of original painting technology, master the production process of original painting, and learn various techniques of original painting, so as to achieve the purpose of artistic creation.

Learning the original painting step tutorial requires certain basic knowledge. First of all, learners should master the basic knowledge of painting, such as color matching, perspective, composition, etc. Secondly, learners should master the basic knowledge of original painting technology, such as the basic knowledge of original painting, the production process of original painting, various techniques of original painting, etc. Finally, learners should have certain artistic creation abilities and be able to create works of art based on their own ideas.

Learning the original painting step tutorials can be achieved in a variety of ways, such as participating in professional original painting training courses, self-study of original painting techniques, attending original painting lectures, participating in original painting exhibitions, etc. Participating in professional original painting training courses can allow learners to master the basic knowledge of original painting technology. Self-study of original painting technology can allow learners to learn original painting technology more systematically. Participating in original painting lectures can allow learners to have a deeper understanding of original painting technology. Participating in original painting exhibitions can allow learners to Learners can feel the charm of original painting technology more intuitively.

Studying the original painting step-by-step tutorial can help learners better master the original painting technology, so as to better complete the original painting works. In the process of learning the original painting step-by-step tutorial, learners need to practice continuously to achieve technical proficiency requirements. At the same time, learners also need to keep thinking to master the ideas of original painting techniques so as to better complete original painting works.

In short, the original painting step-by-step tutorial is a technical learning method that can help you quickly master the original painting technology. Learners need to have certain basic knowledge and master original painting techniques through continuous practice and thinking, so as to better complete original painting works.