If you have good articles or suggestions, you are welcome to leave a message
Garment pattern making is part of clothing design. Fashion design includes style design (style drawings, including expressions of styles, fabrics, colors, etc.); structural design (also called pattern making, pattern processing or pattern making, the specific specifications and sizes of each part); process design (also called parking space) , the sewing process of a finished product). Among them, pattern making plays a connecting role in the middle and is the most important link in the entire clothing design.
Clothing structure design refers to combining the requirements of clothing style design with human body shape, specifications and dimensions, sewing technology, etc. to form various models for cutting, also called paper patterns.
The design of clothing specifications is based on customer requirements, characteristics of knitted fabrics, clothing style structure, market trends and related standards. The relevant standards of clothing specifications are an important basis for clothing specification design. At present, the standards for knitted garment specification design mainly include customer supply specifications, national standards and regional or enterprise standards. For products processed by samples and produced to order, the customer will provide detailed specifications and dimensions or the specifications and dimensions of the main parts, and the organization of production and delivery acceptance will be based on the customer's requirements.
The printing emphasizes three things: accuracy in style, size, and detailed calculations; accuracy in surface, lining, and lining craftsmanship.
Characteristics of knitted garment structural design:
① The structure line expression is simple;
②The degree of relaxation of the girth is small;
③Specifications and dimensions are the main basis for designing the sample;
④The sample design should consider factors such as sewing loss, sewing process retraction, fabric sagging, stretch expansion, etc.;
⑤ Use negative samples to simplify the number of samples;
⑥Use more splicing methods;
⑦ Use auxiliary materials to reinforce or beautify when sewing;
⑧Knitted outerwear production and processing techniques cannot be applied mechanically to woven fabrics. Methods should be selected based on the elasticity, drape and other properties of the fabric.
1. Knitted garment design methods and steps
①. Style design: draw clothing renderings, modify renderings, select main and auxiliary materials, and draw style drawings.
②. Style analysis and determination of specifications and sizes: style analysis, determination of measurement locations and methods, determination of specifications and dimensions of main parts, and drawing of series product specification and size tables.
③. Sample design: Determination of process shrinkage rate, selection of stitch type to determine sewing loss, calculation of drawing size, structural drawing, sample production, small batch trial production, sample modification, nesting and nesting.
④. Sewing process design: select the appropriate stitch type and stitch density; determine the size of the sewing needle to be used; determine the type of suture used; determine the equipment model used; design the process flow and arrangement of the product according to the type of product Draw up a production process flow chart.
This article uses sewing machines, overlock sewing machines, and interlock sewing machines as machines, and takes women's curved-waisted long-sleeved T-shirts as an example to discuss the process of knitted garment pattern making and production technology from the aspects of style design, structural design, and process design.
2. Design and plate making
2.1 Knitted clothing style design (women’s curved waist long-sleeved T-shirt)
Style features: shoulder-fitting, waist-fitting, piping collar, double-needle hemming at the bottom hem and cuffs. The sewing cost is 0.75, the hem sewing cost is 0.5, and the shoulder drop is 3.

Gray cloth composition: The main material is 18tex (40 inches) strand polyester-cotton pique mesh jersey, with a weight of 180g/m2. The segment consumption is 1%, the moisture regain is 8%, and the sloping shoulder sleeve is 1.5.
2.2 Knitted garment structural design
①.Finished product specifications
②. Sample specifications (specification algorithm)
2.3 Draw template diagram
Clothing body sample drawing steps:
①Make a rectangle OACB using the sample dress length and 1 chest width, OA=BC=1 chest width, OB=AC=dress length.
② Take point D and point H respectively on line segment OA, AD=shoulder digging (OD=1/2 shoulder width), OH=1/2 collar width, and draw the vertical line DI of OA through point D.
③Determine the shoulder oblique line: This shoulder drop is 3cm, that is, DN=3cm. The shoulder oblique line can also be determined based on the shoulder oblique angle.
④ With point N as the center of the circle and the size of the body's shoulder strap as the radius, draw an arc and intersect the line segment AC at point E, that is, NE = the size of the body's shoulder strap.
⑤ Take the midpoint F on the ID line, take point G (GI=1/3MI) on the diagonal line of the rectangular EIFM as the reference point, extend MF to point K, make FK=0.5~1cm, and smoothly connect point N and point K, point G, point E, draw arc EN, and make arc EN and shoulder slope HN perpendicular to point N.
⑥ Take T point, L point and R point respectively on straight line AC, ET=2 cm, AL=middle waist, AR=lower waist (i.e. clothing length specification + shoulder seam consumption).
⑦ Draw parallel lines a and b of line segment OA through point L and point R respectively.
⑧ Pick point P on line a, so that the distance from point P to straight line OB is equal to 1/2 waist width (1/2 middle waist width); pick point Q on line b, and the distance from point Q to straight line OB is equal to 1/2 lower waist width. (Put width), line b is the long line of the finished garment.
⑨CR is hem width + hem sewing consumption. Smoothly connect point E, point T, point P, point Q, and point S to create a side seam curve. ⑩Connect point O, point H, point N, point K, point G, point E, point T, point P, point Q, point S, point B, and the large body sample of this product is completed.
Sleeve pattern drawing steps:
①Draw a horizontal line a, and take OA=sleeves and shoulders on the horizontal line a. Here, sleeve shoulder digging = body shoulder digging + seam consumption = 2.5 + 0.75cm.
② Draw line b from point A and make it perpendicular to line a. Draw an arc with point O as the center and the shoulder length of the sleeve as the radius. It intersects line b at point B.
③Make point D 1cm below the midpoint C of OB, and draw the curve ODB as shown in the figure. ODB is the Xiushan curve.
④ On line a, take OE = sample sleeve length = 58.7cm, take EF = hem width + seam consumption = 2cm + 0.5cm = 2.5cm.
⑤ Draw a vertical line of line a passing through points E and F, and make FG = cuff width = 11cm.
⑥Connect the BG line, and divide the BG line into four equal parts, with the midpoint being H. Connect the BHGI curve smoothly according to the requirements in the figure, and make the curve recessed by 0.3~0.5cm at the 1/4 equal part near the sleeve mountain. At 1/4 of the cuff, make the curve convex by 0.3cm. Connect point O, point A, point F, point E, point I, point G, point H, point B, point D, and the sleeve template is completed.
Collar nest template drawing method:
Because this model is a shoulder-jointed round neck, the drawing method is slightly different from the raglan round-neck pattern drawing method in that the impact of shoulder-jointed seam consumption on the collar pattern must be considered. The specific drawing steps are shown in Figure 4.
①Draw a horizontal line a (the position equivalent to the shoulder level line) and a vertical line b (the line of symmetry of the collarbone). The two lines intersect at point O.
② Take OC = 1/2 collar width = 9.25cm on the horizontal line a, take OA = back collar depth = 4.4cm at the upper end of line b, take OB = front collar depth = 9 cm at the lower end of line b.
③ Make the CDB arc according to the requirements in the diagram. The arc is a straight line with a length of 0.75cm (shoulder seam consumption) at point C and is perpendicular to line a; the arc is a straight line with a length of 1cm at point B and is perpendicular to line b. OCDB is the 1/2 model of the front collar nest.
④ Take ON=0.5cm on line a, extend the EA line to M, make AM=ON, and make the MAEC arc as shown in the figure. The CE arc is tangent to the AE line, and there is 0.75cm at point C (shoulder seam loss) The length is a straight line and perpendicular to line a. This is the 1/2 sample of the back collar.
2.4 Specification algorithm for knitted garment structural design
① Specification algorithm: Determine the garment specifications of the garment based on the requirements of the style structure and the body shape of the target. Based on the garment specifications, model specification calculation and design are carried out based on other influencing factors, and model drawing is carried out based on the model specifications. . Suitable for commonly used knitted underwear and knitted outerwear with simple structure.
②Characteristics of specification algorithm
a. Accurately grasp the dimensions of each part to ensure the specifications of the finished product.
b. The template design method of the specification algorithm is simple and easy to learn.
c. The specification algorithm has wide adaptability and is suitable for all knitted fabrics.
2.5 Sample design steps
(1) Select the process shrinkage rate based on factors such as the selected gray cloth raw materials and organizational structure.
(2) According to the drape, stretchability, etc. of the fabric, determine the correction values for the dimensions of certain parts of the sample.
(3) Determine the sewing loss value based on the selected stitch type and sewing equipment.
(4) Calculate the dimensions used in drawing. Based on the specifications and dimensions of the measurement parts determined by the above process design, the shrinkage rate of the sewing process, and the style requirements of the product, the dimensions used in the drawing of the clean sample are calculated.
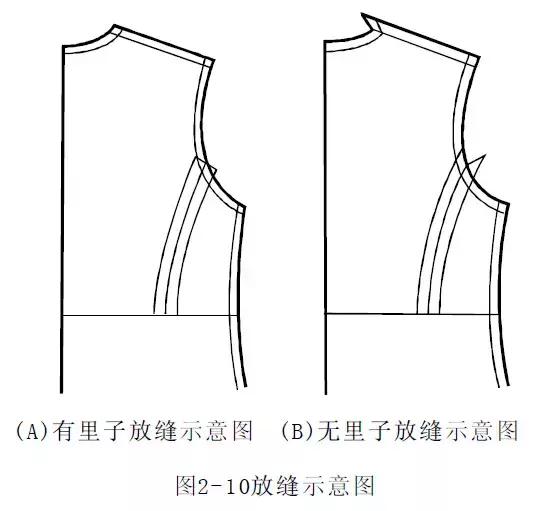
(5) Decompose the net pattern of each garment piece from the net pattern drawn, and then consider factors such as seam type, sewing loss, folding, piping, etc., and add seam allowances to each net pattern to form each garment piece. Mao board.
(6) Sample cutting and small batch trial production. Cut a small amount of clothing according to the designed template and sew a small amount of clothing. During the sewing process, spot checks must be carried out continuously and any problems discovered must be solved promptly.
(7) Modify and copy. If any unreasonable points are found in the trial-produced sample clothes, the sample should be modified, and then the trial-production process should be repeated until the requirements are met.
(8) Nesting and nesting. Use the modified qualified template for nesting and nesting, and modify the bending part during the process to save material.

2.3 Sewing process
"Process" is a unit that constitutes the division of labor in a series of operations. It is a basic link in the production process and an integral part of the technological process. It is also the basic unit for product quality inspection and establishment of working hour quotas. Due to differences in clothing styles and equipment used, even for the same type of clothing, the process will change accordingly, resulting in changes in the sewing processing production line. Sewing process analysis refers to the decomposition of all operations in the process of processing basic materials into finished products, clarifying the nature of the operations, sequence, equipment used, and time required for each processing step, so as to effectively utilize labor and Equipment to process products quickly and at low cost.
(1) Process analysis presentation method There are three presentation methods below for the results of process analysis.
① Process flow method: List the process names in the order of the processes, followed by parentheses to indicate the equipment used in the process, and arrows to indicate the flow direction of the process. This method is simple, intuitive and clear, and is currently used by most knitted garment enterprises in my country. The process of a women's curved-waisted long-sleeved T-shirt is as follows: four-thread seaming on the right shoulder, one single-needle rolling collar, one four-thread seaming on the left shoulder, one cuff, two-needle hemming, one silk sleeve, one four-thread seaming on the left and right side seams, and the bottom of the sleeves. Sew a pair of stitches to roll the hem and tack the logo.
② Process analysis diagram: The process analysis diagram should include the name of the processing process, processing time (pure processing time or standard processing time), type and model of the equipment used or process equipment, process number, etc., as shown in Figure 5. This method is detailed, comprehensive and easy to guide. Various fixed graphic symbols are usually used to distinguish the nature of the operations of each process, as shown in the table.
process icon symbols
③ First list the equipment used, and then explain which processes it is used for and the relevant sewing requirements (if it meets the unified sewing requirements, there is no need to explain in detail). This method shows the equipment used at a glance, can intuitively judge the approximate load of various equipment, and can understand the proportion of equipment.
a. Rolling collar machine: rolling collar (starting from 2cm behind the left shoulder line), with smooth edges on both sides.
b. Lockstitch sewing machine: Join the rolled collar seam (the seam is 1-3cm behind the shoulder seam line, and the heavy needle should not exceed 3cm).
c. Four-thread (or three-thread) overlock sewing machine: sleeves, sleeves, and waist (the front and back seams of the lower corners of the shoulder should be aligned).
d. Three-thread (tucked edge) overlock sewing machine: making sleeve and hem edged edges (the width and width should be consistent, the length of the front open stitch should not exceed 0.2cra, and the seams cannot be taken off).
The purpose of process analysis
① Clarify the content, sequence, time and required tools and equipment of product processing procedures to make production orderly and facilitate production guidance and management.
② The process analysis table or process analysis diagram can be used as the basic data for process preparation, production planning and arrangement, etc., which is beneficial to the balance of the production line.
③In production, identify deficiencies in the processing technology and further improve the process. Improve work efficiency by improving previous product processing procedures.
(2) Sewing process loss
The rolling collar machine piping folds in 0.5cm, the overlock machine 0.75cm, the flat stitch machine 1cm, and the three-thread hemming 0.5cm.
(3) Sewing process shrinkage rate
18tex polyester cotton pique mesh fabric is 2.2%.
(4) Sewing needle requirements
(5)Sewing requirements
①Double-needle hemming: needle spacing 0.6cm, leading edge 2.5cm; double-needle roll the cuff edge and hem edge. Pay attention to the width of the upper and lower carriages, and the side seams, sleeves, left and right, and front and back should be symmetrical;
②Double-needle stretch seam: Double-needle stretch stitch for one week, backstitch, and center seam; the width of the two needle stops is the same; the bottom line is nylon thread.
3. Cutting, layout and material calculation
The cutting project mainly includes material preparation and batching, fabric inspection, seam lifting, material laying and cutting, pattern drawing and cutting, marking and bundling and other technical contents.
3.1 Basic requirements for discharge
(1) The accuracy of garment specifications must be ensured
The accuracy of the garment specifications must be ensured when laying out materials. However, for parts that do not affect the specifications of the ready-made garments, are comfortable and beautiful to wear, and can significantly increase the utilization rate of gray fabrics, appropriate adjustments can be made to the corresponding parts of the sample.
(2) Pay attention to the directionality of the grain and pattern of the gray fabric
When laying out materials, you must pay attention to the arrangement direction of each garment piece and the direction of the gray fabric grain, especially the relationship between the gloss, plush and pattern direction of the fabric surface. Otherwise, it will directly affect the appearance quality of the product.
(3) Increase the utilization rate of gray cloth
Reducing losses and increasing the utilization rate of gray fabrics are the key to layout. Generally, we can start from the reasonable selection of gray cloth width and the correct selection of layout methods. Reasonable selection of gray fabric width has a very significant effect on increasing the utilization rate of gray fabric. Knitted garments have many parts, and they vary with the changes in clothing styles. The layout method should be determined based on a comprehensive analysis of the characteristics of the sample and the width of the gray fabric.
(4) Select the best solution
Generally speaking, knitted outerwear has many parts and the layout method is more complicated. No matter what kind of product, especially products with larger batches, several layout plans should be compared and the best plan should be selected to make the layout more reasonable, achieve the purpose of saving materials and reducing raw material costs.
3.2 Determine the width, section length, material area and discharge method
The width of the gray fabric is commonly known as the door width. Here it refers to the width of the gray fabric after the tubular knitted fabric has been finished and shaped. The width range of various tubular weft knitted gray fabrics produced in my country after dyeing and finishing processing is usually 35-70cra (corresponding to the range of the gray fabric cylinder circumference is 70-140cm), and the width is one every 2.5cm If the grade difference is 5em, then the grade difference of the corresponding gray fabric cylinder circumference is 5em. The width of the gray fabric is mainly estimated and determined based on the type of garment piece, the characteristics of the pattern and the specifications of the corresponding parts of the garment.
(1) Width, section length, material area and layout method of the large body model
Width=42.5+2.5=45cm
Section length=58.7*2-1.5=115.9㎝
Number of segments = 10 pieces/2 pieces per segment = 5 segments
Area=(45*2)*(115.9*5)=52155 cm²
The large-body model layout adopts the seam-lift nesting method.
(2) Width, segment length, material area and layout method of sleeve template

Width=20+10+2.5=32.5㎝
Section length (5 pieces)=58.7*5=293.5㎝
Number of segments = 10 pieces/5 pieces per segment = 2 segments
Area=(32.5*2)*(293.5*2)= ²
The sleeve pattern layout adopts the intersection method.
(3) Calculation of material area for 10 pieces (material area for 10 pieces includes body and sleeve length)
10 pieces of material area = body material area + sleeves = 52155 cm² +² = 90310 cm²
Actual materials used for the total material area of 10 pieces = 90310 cm² / (1-1℅) = 91222 cm²
Material weight of bare blank for 10 products (g) = actual area of 10 products*dry weight*(1+moisture regain)/1000=²*180g/m²*(1+8%)/=1.77㎏
4. Sorting and packaging of knitted garments
Knitted gray fabrics are generally shaped and calendered before cutting. The shape of the gray fabric and the loop structure of the knitted fabric are relatively stable. However, after cutting, sewing and other operations, the finished product will inevitably produce wrinkles and creases, which not only affects the appearance, but also affects the appearance. Moreover, quality inspection and packaging cannot be carried out smoothly, so they must be ironed.
1. Ironing process requirements
(1) When ironing knitwear, the temperature of the iron must be strictly controlled to avoid yellowing, discoloration or deterioration of the finished product or blurring of the printing. The temperature and weight of the iron should be determined according to the type of gray fabric and the composition of the fiber raw materials. , especially when using mechanical ironing, be sure to control the temperature, pressure, time and steam volume.
(2) Seams should be ironed straight and smooth, the outline of the clothes should be ironed, and important parts such as collars should not be deformed.
(3) Use natural force when ironing by hand to prevent pulling and affecting the size of the finished product. Stretchy products should maintain their original elasticity, such as those with ribbed hems. The ribbed parts should be ironed after pulling out the support plate.
(4) Generally, knitwear needs to be ironed on both sides, with the back of the garment ironed first and then the front. Advanced products need to be ironed on three sides, that is, the front is ironed again after the ironing plate is pulled out. If the temperature of the iron is not automatically adjusted, you can use the following method to identify it. Drop a drop of water on the bottom of the iron and observe the shape of the water drop and the sound it makes when it evaporates.
2. Knitted garment packaging design principles
(1) Clothing folding requirements
After the product has been inspected and rated, it must be folded according to regulations for packaging. Some knitted garments must be supported by hangers for storage and transportation, so they do not need to be folded.
The basic requirements for folding are:
① Fold into a rectangle of a certain size (length x width) according to the specifications of packaging bags, boxes, and boxes;
② The collar of the clothes should be stacked in the center of the front, the collar shape should be symmetrical, and the trademark on the collar should be easy to observe;
③After folding, the thickness should be as uniform as possible on all sides, so that it is not only beautiful but also easy to stack. When folding, you can use the lining board to compare the folds, which makes it easier to achieve uniform size and improve the folding speed and quality.
(2) Packaging form: bag, box, box, hanging.
(3) Packaging materials: paper, plastic film.
(4) Calculation of auxiliary materials (amount for 10 pieces) a. Suture 41g. b. 10 trademarks and 10 wash water labels each. c. 1/5 environmentally friendly plastic bag. 1/5 carton.