Qt Double-clicks To Run The Executable File (.exe) Generated In Debug And Release Modes

The executable file cannot be run and the application cannot be started normally.

1. Problems that arise, as shown in the figure below

Double-click the executable file (.exe) generated in Debug mode to run Qt, and it prompts that the application cannot start normally. Please click OK to close the application.

2. Analysis

This is caused by the lack of Qt's dynamic link files (.dll), such as .dll and other library files. The full name of DLL is Link, which is called "dynamic link file" in Chinese. In the operating system or Linux system, the library file is used for program execution. It is very important, because when the program is executed, it will depend on many Qt libraries and must be linked to the library files before it can run." The library files are as shown in the figure below

3. How to solve it? 3.1 The first method (not recommended)

Since it is missing, just put the corresponding dynamic link file in the executable file (.exe) directory, but this requires knowing what the missing dynamic link file is, and you have to find it every time you create a new project. The dynamic link file may be different for each project, so it is not recommended.

3.2 The second method (recommended)

We just put the bin directory path in the Qt installation directory into the system variable.

The principle is: there must be corresponding dynamic link files in the files in the bin directory. When qt executes the executable program generated by Debug and mode, it will automatically search for the corresponding file in the directory specified in the system variable, which is equivalent to the first This method is just that Qt automatically searches for the required dynamic link library files in the specified environment variables.

Our compilation is divided into 32-bit and 64-bit. The compiler under Qt is generally the integrated development compiler under Qt. The MSVC (C/C++) compiler is the integrated development compiler under Qt. The compiler like mine is Qt combined with vs. For development in China, as shown in the figure below

We need to put the bin directory under the corresponding compiler in the system variable. How do we know which compiler is used in our project?Just look at the picture below. The project shown in the picture uses a 32-bit compiler.

Then copy the path and put it in the system variable path. Open the computer's properties. The operation is as shown in the figure below. It is recommended to put the paths in the bin directory under the 32-bit and 64-bit compilers in the system variable path.

Click OK, OK…, and then double-click the corresponding executable file (*.exe) to run it

Under normal circumstances, there will be no problem at this point.

4. In special cases, dynamic link libraries other than Qt may be used.

As shown in the figure below, this dynamic link library is a link library that I compiled and added. It is needed in the program and is not included with Qt.

At this time, even if the above operations are performed and the bin directory path is placed in the system variable, the generated executable program (*.exe) of Debug and mode cannot be run by double-clicking it.

What to do at this time?

4.1 The first solution

Since it is missing, just put the corresponding dynamic link file in the executable file (.exe) directory, but you need to know what the missing dynamic link file is. Generally, the lib module in the link library is missing. dll file, for example, I am importing a module, so what is missing is the .dll file. Just copy it to the executable file (.exe) directory. If you want to package and publish it on other computers, you need to use this Method, otherwise other people's computers will not be able to run without this link library.

4.1 The second solution

Putting the path of the link library in the system environment variable is equivalent to letting the computer automatically search for the library files required for the executable file. It will not automatically copy a copy to the executable directory. This method is not suitable for packaging and distribution. For computer use, because other computers do not have this library file and cannot be executed. If you want to package and publish it, use the first solution.

When working in the IT industry, you will always encounter many problems, which you have figured out by yourself. After experiencing them, you will understand next time. If this article is helpful to you, give it a like and support!

World Of Warcraft: List Of Ways To Obtain The Cute Flying Pets "Golden Skyclaw" And "Earl"

Thanks to Monkey for providing the test qualification, and to [ermeng alice] for providing the ruby ​​character. The content of this post is based on the test server version 9.0.1.35789. We do not rule out the possibility of modifications in subsequent versions and the official server. Please refer to the official server for everything.

1. How to obtain the pet "Golden Claw Bird":

Currently, the system does not directly indicate the source of this pet, but it is already available in the test server. First, players need to go to the "50,59" position in the fortress map. As shown below:

After passing there, you will find that there are many red-striped monsters in the area called "Cloud-feathered Birds Thirsting for Anima". Start killing these monsters. Every time you kill one, the chat channel will display the message "A dying cloud-feathered bird let out a painful cry." As shown below:

Kill about 6-8 Cloud Feather Birds, and a rare elite "Cloud Feather Nest Father" will be refreshed on the regional map. At the same time, the chat channel will also display "The Cloud Feather Nest Father who lost his chick screamed angrily." , and then this elite will slowly fall to the ground and become attackable!

After killing the elite, the cute little pet "Golden Skyclaw Bird" will be yours! (The test server currently has a BUG and cannot learn pets, so the actual renderings cannot be shown. Sorry.)

2. How to obtain the bat pet "Earl":

Players need to go to location "58,44" in the Revendreth map. As shown below:

After passing by, you will find a dormant stone bat on a nearby steeple building, as shown below:

Talk to this stone statue and the option "Awaken the Earl" will appear. Click on the prompt to use 99 energy-infused rubies to awaken the count.

"Energy-infused rubies" have a chance to drop from any monster in the Revendreth map. The currency limit is 100. It should be easy to get 100 when doing quests and running the map in Revendreth. You can get this pet after handing it in. It also has a ruby ​​necklace around its neck, which is very cute!

How To Exit Full-screen Mode In Computer Games?The Method Is Very Simple, Hurry Up And Collect It

Many friends don’t know how to exit full-screen mode when playing games on their computers. This article uses the familiar “League of Legends” as an example to teach you how to do it.

1. Log in to the game

The method to log in to the game is relatively simple. It is nothing more than entering your account number and password, and then entering the main interface of the game. I won’t go into details here. As shown below:

2. Enter the game

After logging into the game, select the word "PLAY" in the upper left corner to start a game. It needs to be explained here that because the full-screen mode of the game can generally only be set within the game, you must enter the game first. As shown below:

3. Call out the menu

After entering the game, directly press the "ESC" key on the keyboard, which is located in the upper left corner of the keyboard. As shown below:

After pressing the "ESC" key, a menu will pop up, which is used to set the in-game screen. As shown below:

4. Set window mode (exit full screen mode)

After calling out the menu, switch the interface to the "Video" option and set the "Window Mode" to "Window". As shown below:

After the settings are completed, click "OK" in the lower right corner, and the game will change to the "Window" interface. As shown below:

At this time, the game will be displayed on the desktop, and some applications opened on the desktop "taskbar" can be seen. At this time, the game interface is in window mode and exits full-screen mode.

Note: The computer model used in the demonstration in this article is ASUS Flying Fortress 6, the computer system version is 10 64-bit Home Chinese version, and the League of Legends version is Ver 12.7.

How To Generate Random Numbers In Excel (How To Generate Random Numbers In Excel)

Content navigation:

1. How to generate random numbers in excel

1. First, let’s introduce how to use the RAND() function to generate random numbers (it will not be repeated when multiple values ​​are returned at the same time).

As shown in the figure below, enter =RAND() in the cell and press Enter to return a random number to the cell.

2. The range of random numbers returned by the RAND() function is greater than 0 and less than 1. Therefore, it can also be used as a basis to generate random numbers within a given range.

3. The method of generating random numbers within a specified range is as follows. Assume that the minimum range of a given number is A and the maximum is B. The formula is:

=A+RAND()*(BA).

For example, to generate a random number greater than 60 and less than 100, because (100-60)*RAND() returns a result between 0 and 40, plus the lower limit of the range 60, it returns a number between 60 and 100.

4. The RAND() function above returns a random decimal number between 0 and 1. If you want to generate a random integer, you need to use the () function. As shown in the figure below, this function generates a random integer greater than or equal to 1 and less than or equal to 100.

The syntax of this function is as follows: = (lower range integer, upper range integer), and the result returns an integer including the upper and lower limits. Note: The upper and lower bounds may not be integers and may be negative.

5. RAND() and () are the basic functions for generating random numbers, and they can also be flexibly modified. For example, if you want to generate a random number between 0.01 and 1 that contains two decimal places, you can use the formula in the figure below:

2. How to randomly generate data in excel

The method to randomly generate data in excel is as follows:

1. First, you can use functions in Excel to generate random integers within a specified range. Generate random numbers from 1 to 100 in B1:B4, select a range, and enter a formula.

2. Press Ctrl+Enter to end the input and get random numbers.

3. Press F9 and the random numbers will be refreshed.

4. If you want to generate random decimals, you can consider dividing by a multiple of 10 later, as shown in the figure below to generate a random number between 10 and 100 containing two decimal places.

5. Finally, you can see that the page has generated random data, so the problem of randomly generating data in excel is solved.

3. How to simulate random numbers in Excel spreadsheet

Then switch to the Data tab and select Data Analysis. In the pop-up data analysis dialog box, select "Random Number Generator" and click OK to simulate. detailed steps:

1. Open excel, first make a table recording the front and back sides of the coin, just two columns, use the sequence to fill the first column number to 1000, as shown in the following figure:

2. Then switch to the data tab and select data analysis, as shown in the figure below:

3. Select "Random Number Generator" in the pop-up data analysis dialog box and click OK, as shown in the figure below:

4. Select "Bernoulli" in the distribution item, set the number of random numbers to 1000, P (A) = 0.5. Select b2 in the output area, and click OK, as shown in the figure below:

5. You can see that the simulation results have been generated in column b, 0 and 1. Use 1 to represent the head and 0 to represent the tail. Create a simple statistical table next to it, such as the front side. Enter "=(B2:B1001,1)" in the cell. Just change 1 to 0 for the back side to count, as shown in the figure below:

CAD Skills Tutorial, CAD Hook Drawing Plan Drawing

Today I saw a student asking how to draw a hook. Here our teacher Wan has specially created a simple and easy-to-follow graphic tutorial for everyone, so that every novice can easily learn to use CAD to quickly draw a hook!

Without further ado, let’s take a look at the case results first

●How to operate

Step 1: Open the software–open the case file (we will get it if you don't pay attention)–draw two positioning lines (as shown in the figure below)

Step 2: Draw a circle with a diameter of 24 – offset the vertical line 5 to the right – draw a circle with a radius of 29 at the intersection point (as shown in the figure below)

Step 3: Offset the horizontal positioning line downward by 9 – then offset the diameter 24 circle outward by 24 – and then draw a circle with a radius of 24 at the intersection of the offset circle and the 9 line (as shown below) . Then delete the yellow auxiliary circle!

Step 4: A circle with a radius of 29 and an outward offset of 14 (green) will create an intersection with the arrow – draw a circle with a radius of 14 at the intersection and delete the green offset auxiliary circle.

Step 5: Enter F (fillet) and press Enter, the radius value is 2, select circles with radius 14 and 24 to generate a circle with radius 2; get the effect as shown below!

Step 6: Enter TR and press Enter twice to trim the unnecessary parts to get the effect as shown below!

Step 7: Use offset to create the following effects on the positioning line

Step 8: Enter F (fillet) and get 36 and 24 radius arcs (as shown in the picture below); it is almost 90% complete!

Step 9: Use offset to get 14 and 23, and trim off the excess lines to get the picture below (basically 95% complete)

Step 10: Finally, make a 2X45 chamfer, change the positioning line to the final line type, and thicken the outline to get the final effect!

Okay, has everyone learned it? If not, we will also record this case as a video tutorial! If you need to get the video and original case documents, follow us and reply in the comments below to get them!

When I have time later, I will give you a three-dimensional model tutorial of a hook.

If you think this article is useful to you, please follow it~ We will continue to share various CAD skills!

If you have any unresolved questions, you can tell me below in the comments or send me a private message, and I will try my best to answer them for you~

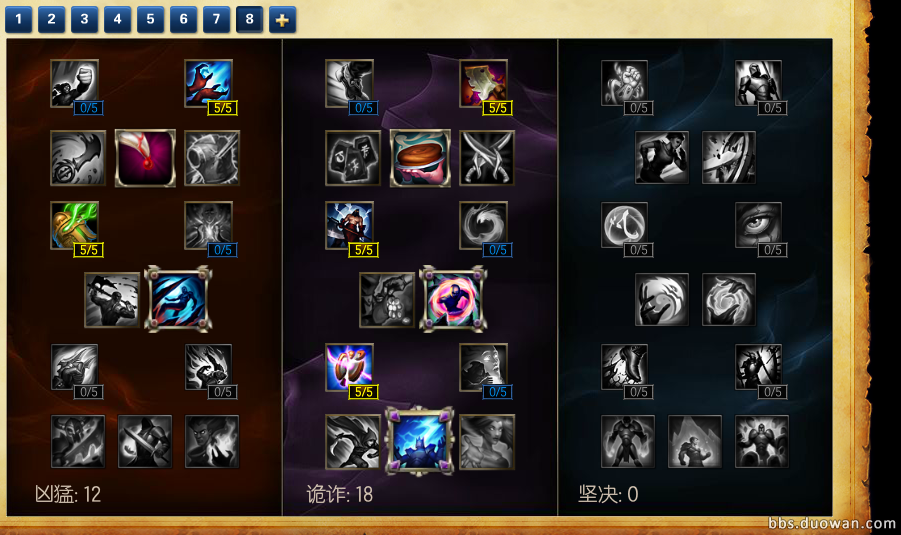
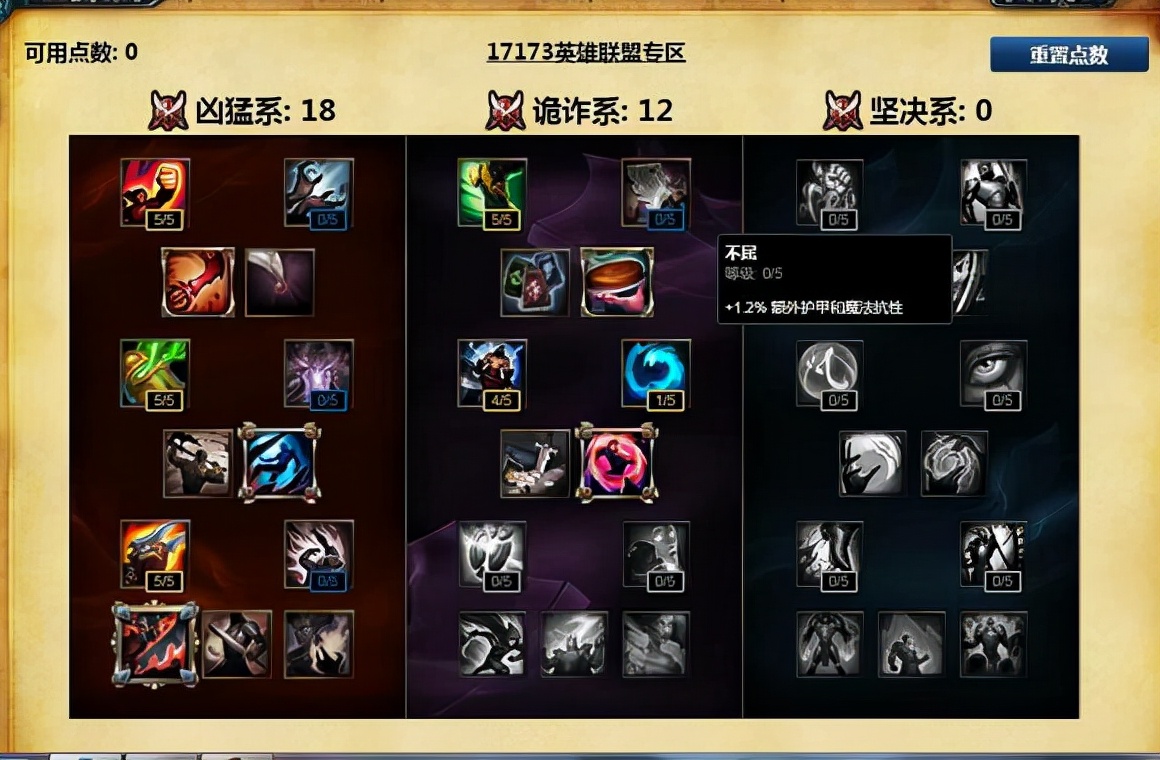
How To Match The Talent Map Of The New Version Of S6 In LOL Talent Points Collection

Article navigation

Fierce talent tree

The talent system of LOL in the new season has been greatly revised. Many talents have been added and adjusted. In addition, the heroes have also been adjusted. Your previous methods of adding talent points may not be applicable to the current version. Here is an introduction to the talent points for each position in S6. method.

overall concept

We're updating the talent system to provide more focused, high-impact choices, rather than the previous subtle optimization of a series of stats. The impact of each level of decision-making will gradually increase with the number of levels, and when you reach the deepest level, you will be provided with the ultimate "cornerstone talent", which can fundamentally affect the way you use heroes.

Fierce talent tree

It is no longer an "attack system" talent tree. Let’s take a look at the types of rewards provided by the ferocity talent tree. This series of talents is all about how to enter the battlefield, how to stay on the battlefield, and how to crush the enemy. Most of its bonuses help you against large groups of enemies (attack speed and % penetration are "always useful"), but burst mages or assassins can also find some bonuses needed to pull off solo kills. Want to deal damage, but worried about being attacked by tanks and warriors? Then become fierce and fight back!

Tier 1

You can divide 5 talent points between the following talents:

furious

Attack speed: 0.8/1.6/2.4/3.2/4%

witchcraft

Skill damage increase: 0.4/0.8/1.2/1.6/2%

Tier 2

You can choose 1 from the following talents (costs 1 talent point):

double edged sword

(Known BUG: Currently only effective for creeps and wild monsters)

Melee – Deals 3% more damage, takes 1.5% more damage.

Commonly used ap talent s6_ap jungle prince talent rune talent_ap clown talent rune talent

Remote – Deals 2% more damage, takes 2% more damage.

feast

Article navigation

Deceit talent tree

Deceit talent tree

It is no longer a "universal" talent tree. The deception talent is for those who live in the moment. Want more movement speed to bail out an ally? Or do you want to rush the tower and take away an anemic target? Then the deception talent is your first choice talent tree! Please note: unlike what the Ferocity talent offers, the Subterfuge talent is more effective against softer targets, so think about who you're going against before allocating your talent points.

Tier 1

You can divide 5 talent points between the following talents:

wanderer

Movement speed bonus in non-combat state: 0.6/1.2/1.8/2.4/3%

brutal

Basic attacks and single target skills cause 1/2/3/4/5 additional damage to minions and monsters.

Tier 2

You can choose 1 from the following talents (costs 1 talent point):

Fu can be friendly

The duration of buffs provided by monsters is increased by 15%.

secret reserve

The duration of your potions and flasks is increased by 10%.

Your health potions will be replaced with biscuits, which instantly restore 20 health and 10 mana when consumed.

Level 3

ap clown talent rune talent_ap jungle prince talent rune talent_commonly used ap talent s6

You can divide 5 talent points between the following talents:

ruthless

Causes 1/2/3/4/5% additional damage to heroes whose health is below 40%.

meditation

Every 5 seconds, restore 0.3/0.6/0/9/1.2/1.5% of your lost mana.

Level 4

You can choose 1 from the following talents (costs 1 talent point):

cloud explorer

Each time an ally kills a nearby enemy minion, you will receive 1 gold coin.

Whenever you hit an enemy hero with a basic attack, you will receive an additional 3 gold coins (10 gold coins if you are a melee hero)

Cooling time: 5 seconds

dangerous game

Killing or assisting in killing a hero will restore 5% of your lost health and mana.

Level 5

You can divide 5 talent points between the following talents:

Precision

Armor Penetration and Spell Penetration: 0.6/1.2/1.8/2.4/3 + 0.06/0.12/0.18/0.24/0.3x level

Total penetration at level 18: 1.7/3.4/5.0/6.7/8.4

resourcefulness

commonly used ap talent s6_ap clown talent rune talent_ ap jungle prince talent rune talent

Cooldown reduction: 1/2/3/4/5%

Cooldown reduction upper limit: 40% >>> 41/42/43/44/45%

Cornerstone Talent

You can choose 1 from the following cornerstone talents:

Stormrider's Surge

If you deal damage equal to 30% of the enemy hero's maximum health within 2 seconds, you will gain 35% movement speed for 3 seconds.

Cooling time: 10 seconds

Thunder Lord's Edict

Your third attack or spell cast on an enemy hero shocks the area around the target, dealing magic damage to enemies within the range ranging from 10-180 (+0.2x Bonus Attack Damage) (+0.1x Spell strength)

Cooling time: 30 seconds

Windspeaker's Blessing

The amount of your healing and shielding skills is increased by 10%.

If your shield skills and healing skills are cast on a friendly target other than yourself, the target's armor and magic resistance will be increased by 15% for 3 seconds.

Article navigation

Resolute talent tree

Resolute talent tree

The Resolve talent tree has had the least changes in terms of reasons for choosing this talent – it's still for those who want to be in the center of the fight and survive for the long haul. If you want to stay alive in order to output control and initiative skills as much as possible, then the Resolve talent is for you.

Tier 1

You can divide 5 talent points between the following talents:

heal

commonly used ap talent s6_ap clown talent rune talent_ ap jungle prince talent rune talent

Life regeneration: 0.4/0.8/1.2/1.6/2 every 5 seconds

unyielding

Extra armor and magic resistance: 1.2/2.4/3.6/4.8/6%

Tier 2

You can choose 1 from the following talents (costs 1 talent point):

explorer

+12 movement speed in grass and rivers

hardened skin

Basic attack damage from heroes and monsters is reduced by 2.

Level 3

You can divide 5 talent points between the following talents:

Rune Armor

The healing effect from all sources is increased by 1.6/3.2/4.8/6.4/8%

The shield effect on you is increased by 1.6/3.2/4.8/6.4/8%

Veteran scars

Extra health: 0.8/1.6/2.4/3.2/4% of total health

Level 4

You can choose 1 from the following talents (costs 1 talent point):

Insight

Commonly used ap talent s6_ap jungle prince talent rune talent_ap clown talent rune talent

(Known BUG: The cooling time cannot be shortened temporarily)

The cooldown of your summoner abilities is reduced by 15%.

durable

+50% health regeneration, increasing to +200% when health is below 20%

Level 5

You can divide 5 talent points between the following talents:

sensitive

Slow resistance and toughness: 3/6/9/12/15%

Legendary Guard

Each nearby enemy hero provides you with 0.6/1.2/1.8/2.4/3 armor and magic resistance.

Cornerstone Talent

You can choose 1 from the following cornerstone talents:

Grasp of Immortality

Every 4 seconds during combat, your next basic attack against an enemy hero will steal health equal to 3% of your maximum health (if you are a ranged hero, this effect is halved)

The power of time

When you or nearby allies kill large monsters and siege minions, your maximum health will be increased by 20 and 10 respectively (maximum value: 300).

After reaching the maximum bonus, each kill of a siege minion will restore 100 health points to you. (Known BUG: No therapeutic effect is provided for the time being)

Stone Pledge

Damage reduction: 4%. Doubled to 8% when next to an ally

You take 8% of the damage taken by the nearest ally. This effect will not bring your health below 15%.

How To Draw Anime Character Chests?Tips For Drawing Anime Character Chests

How to draw anime character breasts? For those who don’t know how, come and see the techniques for drawing anime characters’ chests! The chest is located in the upper part of the front of the body. Although it occupies a small area, it has a great impact on the form of visual support for the whole body. The difference between male and female breasts is also one of the differences in secondary sexual characteristics in human adulthood. So how should anime characters’ breasts be drawn to look good? In fact, if you want to draw the chest of anime characters well, you need a little skill, so let’s start with our drawing techniques of anime characters’ chests now!

chest position

As shown in the picture below: ① The entire chest occupies about two-fifths of the chest, and the boundaries between the left and right sides of the chest are at the armpits. ② Viewed from the side, the lower edge of the chest is approximately near the lower edge of the deltoid muscle. ③If you look at it from the back, the lower edge of the anime character’s chest will look a little higher than the lower edge of the shoulder blade.

Manifestations of Male Chest

Big breasts beauty cartoon_Big breasts beauty cartoon_Big breasts beauty cartoon

Chest shape: The male chest is similar to a square. The chest is usually very flat, and the two ends of the chest intersect with the deltoid muscles, so a T-shaped line is formed at the armpits.

Men's breasts, although flat, are also three-dimensional and can be represented by the shadow on the lower edge of the chest (left). The deltoid muscles are like armor covering the ends of the pectoralis major (pictured right).

Big breasts beauty cartoon_Big breasts beauty cartoon_Big breasts beauty cartoon

representation of female breasts

Chest shape: On the underside.

Big breasts beauty cartoon_Big breasts beauty cartoon_Big breasts beauty cartoon

Changes after wearing it: When restrained by underwear, the expanded breast contours on both sides also converge toward the middle, and wrinkles appear between the breasts.

Big breasts beauty cartoon_Big breasts beauty cartoon_Big breasts beauty cartoon

The connection between arms and chest: As shown in the picture below, when the anime character is in profile, we can first draw the overall outline of their chest, and then add the rough lines of the chest. If the character lifts his upper arm, the muscles in his chest will also lift and stretch, so the raised chest will be a little higher than the chest on the other side.

Different changes in breasts

Big breasts beauty cartoon_Big breasts beauty cartoon_Big breasts beauty cartoon

Changes in different bust sizes: Generally, girls’ breasts don’t look very big, and flat chests can be represented by slightly undulating contours (as shown on the left side of the picture below). If you want to draw the plumper breasts of a mature woman, you can draw the breasts as a sphere, and first draw the outline of the sphere when drawing. Notice that the larger breasts are squeezed together to form a line in the center (right in the image below).

Changes in special angles of the chest: Even at some tricky angles, we can still draw the chest line to show the thickness of the chest cavity. As shown on the left side of the picture below, female breasts are three-dimensional. When the angle is changed to a bird's-eye view, the breasts are W-shaped. The W-shape of the chest hides part of the abdominal structure, creating a vertical perspective.

How to draw anime character breasts? Tips for drawing anime character chests! This is the end of the introduction. Here I would like to recommend to you the offline courses offered by Hua Xueba on animation and cartoon training: Comic design employment class. In addition to learning courses that are in line with the industry, Hua Xueba also has many connections with the industry. Cooperate with a company, so that students can participate in real business projects while in school, familiarize themselves with the production process of corporate projects in advance, and it will be easier to get started after graduation. Isn’t it exciting? Interested students should quickly sign up for a trial!

The Super Practical "layering" Surefire Technique Requires Just Five Moves To Instantly Transform You Into A Fashionable And Sophisticated Person In The Depth Of Winter, With A Very Light And Mature Temperament.

Late winter is a paradise for fairies who are keen on all kinds of "layered looks"! This article will start from the aspects of color matching, texture, etc., and provide fairies with five super practical "layering" tricks, which will make you instantly fashionable in late winter, with a precise and sophisticated temperament! Let Li Zijun give you a few examples:

Picture source: "LEE" (January 2022 issue)

1. The super practical “layering” trick to instantly become fashionable in late winter: the vertical layering method

Vertical layering method: create a sense of vertical layering through the height of the collar and the length of the hem. The vertical layering method can be said to be the most common and easiest to use "layering" matching method in late winter.

Source: Internet

1. Vertical layering method: the height of the collar

The most basic combination: "turtle collar bottoming shirt + dress". The "small V-neck" design creates a perfect vertical layering, making the whole person look tall and thin! Pair it with various types of jackets with thick texture to keep you warm and elegant at the same time!

Picture source: "Story" (January 2022 issue); "BAILA" (January 2022 issue); "" (January 2022 issue)

This winter, "retro style" is still the general trend. Choose a solid color dress with retro elements such as leg-of-mutton sleeves, ruffles and other retro elements to match it with a turtleneck bottoming jacket of various colors. It will give you a mature and dignified temperament!

Picture source: "" (January 2022 issue)

In addition to dresses that are the easiest to wear, if you want to create a multi-layered "layered" visual effect and show off your matching skills and good aesthetic taste, you can also start with an "elegant skirt"!

As shown in the picture below, wear a beige high-necked bottoming coat with a dark gray pleated skirt and white boots, and a dark gray shirt. It is simple and advanced; or you can choose the most classic "black and white combination" and wear a long color-blocked fringed scarf, which is simple and elegant. gorgeous!

Picture source: "BAILA" (January 2022 issue); "LEE" (January 2022 issue)

2. Vertical layering method: the length of the hem

The most common combination is to create a sense of vertical layering through the "length of the hem": first, choose a white shirt as a transitional item, which is very eye-catching; second, include the collar, and together with the hem, the visual layering effect is instant. Double it!

Picture source: "BAILA" (January 2022 issue); "VERY" (January 2022 issue)

As shown in the picture below, a beige turtleneck sweater is layered with a white shirt, and white harem pants and high-heeled boots are worn underneath. It is pure and gentle; a black round-neck sweater is layered with a ruffle-collar white shirt, and khaki wide-leg pants and high-heeled boots are worn underneath. , a little bit sweeter between intellectual and capable~

Since the indoor temperature is too high, you can choose to layer a deep V-neck knitted vest or sweatshirt with a white shirt, which is simple, dignified and breathable!

Picture source: "VERY" (January 2022); "LEE" (January 2022); "Gina" (Winter 21-22 issue); "Gina" (Winter issue 21-22)

PS: Special recommendation for vertical layering method: blue shirt

Compared with the common white shirt, the blue shirt has a little more unique atmosphere! As shown in the picture below, a black and white striped sweater is layered with a blue stand-up collar shirt, black leather pants and loafers underneath. The monotonous black and white combination adds a bit of calmness and elegance because of a touch of bright blue~

Picture source: "" (January 2022 issue)

2. The super practical "layering" trick to instantly become fashionable in late winter: the texture layering method

Texture layering method: refers to the layering of different textures of single products ~ soft texture (such as cotton, silk, yarn, etc.) is worn next to the skin, and stiff texture (such as leather, coarse wool, etc.) is used as an outer layer. to rough visual effects to create a unique and eye-catching layering look!

Source: Internet

1. Texture layering method: cotton turtleneck

The comfortable and breathable cotton turtleneck is a must-have item for late winter, and the versatile and durable black model is the best!

As shown in the picture below, a black cotton turtleneck is paired with an orange taffeta skirt and snake-print pointed-toe shoes. It is covered with a khaki leather jacket and a gold chain is embellished around the neck. It is sassy and beautiful, showing a charming style. It is definitely a party date. The best layering look!

Wear a black cotton turtleneck layered with various shirts, paired with smart trousers and a super warm jacket to look taller, slimmer and full of aura!

Picture source: "VERY" (January 2022 issue); "Oggi" (January 2022 issue); "Oggi" (January 2022 issue)

A color scheme worth trying in late winter: "cream white + gentle brown". When applied to the texture layering method based on "cotton turtleneck", the effect is amazing!

As shown in the picture below, a cream-white cotton turtleneck is paired with a gray-brown umbrella skirt and caramel brown high-heeled boots. The outer layer is a gray-brown V-neck knitted vest. The gold sweater chain is embellished with white space. It is simple, intellectual, and sophisticated and easy to achieve~

Picture source: "LEE" (January 2022 issue); "Oggi" (January 2022 issue)

2. Texture layering method: super elegant shirts

Shirts are a must-have item in the workplace in all seasons. As another member of the "texture layering method", the layering effect cannot be underestimated!

As shown in the picture below, a white stand-up collar shirt is layered with a black sleeveless knitted long skirt and black high-heeled boots. The golden clavicle chain enhances the sophistication and easily outlines the image of a classic modern girl!

A blue and white striped stand-collar shirt is layered with a black hollow crochet sweater, dark blue wide-leg pants and black loafers, which is simple, free and easy yet calm~

Picture source: "LEE" (January 22 issue); "VERY" (January 22 issue); "Story" (January 22 issue); "MORE" (January 22 issue)

The retro-style shirt using ribbon elements is also suitable for the "texture layering method", giving it a more elegant and romantic French style!

As shown in the picture below, a black ribbon shirt is layered with a sky blue sweater, a black skirt and boots, and a retro plaid suit. It is simple, mature and elegant~

Picture source: "MORE" (January 2022 issue); "" (January 2022 issue); "BAILA" (January 2022 issue)

3. The "third trick" of the ultra-practical "layering" technique to instantly become fashionable in late winter: the contrasting color pattern layering method

Contrast color pattern layering method: refers to the visual layering effect achieved through the collision between strong colors and bold patterns. However, the overall look still needs to have a neutral color (black, white and gray) to balance it, so as not to fall into the chaos of "everyone doing their own thing" ~

Source: Internet

As shown in the picture below, the former uses a knitted cardigan with a personalized pattern to reconcile the overly casual inner wear, while the latter uses a mix and match of blue, gray and brown to show personality without losing simplicity!

Picture source: "BAILA" (January 2022 issue)

1. Pattern layering method

The pattern layering method applies to both “internal and external matching”~

As shown in the picture below, a black wavy sweater is layered with a blue shirt, gray jeans and black boots, which is simple, capable and eye-catching; a red and white striped shirt is worn as a base, a cream and white knitted vest is layered, dark blue jeans and black high heels are worn Boots, capable and intellectual and reduce your age!

Picture source: "LEE" (January 2022 issue)

As shown in the picture below, a violet printed dress is layered with a military green knitted vest, a light gray woolen coat, black boots and a commuter bag to balance the overall look, which is elegant, bright and gentle~

Picture source: "LEE" (January 2022 issue)

2. Contrast color layering method

Say goodbye to black and white, choose gray as a balance aid, and have a more advanced texture~As shown below, wear a light gray turtleneck with dark gray jeans, layered with a goose yellow knitted cardigan, creating a lazy and bright temperament;

Choose the hot blue tone in winter for contrasting color matching, which is equally eye-catching! As shown in the picture below, a sky blue ribbon shirt is layered with a goose yellow round-neck sweater, black wide-leg pants and leopard print shoes. It is bright, moving and smart!

Picture source: "MORE" (January 22 issue); "" (January 22 issue); "MORE" (January 22 issue); "LEE" (January 22 issue)

Or choose a small area with contrasting colors, which is easier to control and the effect is equally outstanding! As shown in the picture below, a red turtleneck is layered over a dark khaki dress, dark brown high-heeled boots are worn underneath, and a cream-and-white plush short jacket is worn on top. It is elegant, luxurious and stunning!

Picture source: "" (January February 2022 issue); "" (January 2022 issue)

4. The "fourth trick" of the ultra-practical "layering" technique to instantly become fashionable in late winter: layering method from shallow to deep

Layering method from light to dark: refers to achieving the visual purpose of layering by using a color scheme from light to dark. Choose light-colored items close to the cheeks that can brighten the skin tone.

Source: Internet

As shown in the picture below, a light-colored shirt is worn as a base, layered with a light-colored sweater, wide-leg pants and high-heeled boots/shoes that add aura, and a black jacket. The overall look is simple and individual. , full of aura!

Picture source: "" (January February 2022 issue); "" (January 2022 issue)

PS: This winter’s special recommended item—striped shirt

As shown in the picture below, she wears a striped shirt as a base layer, a black suspender skirt, a navy blue parka, red high heels, a black retro chain bag and a pearl necklace as embellished details. It is modern, beautiful and super retro!

Picture source: "" (January 2022 issue); "BAILA" (January 2022 issue)

5. The super practical "layering" trick to instantly become fashionable in late winter: the "fifth trick": layering the same color with different textures

The same color and different texture layering method: refers to the contrast between items of the same color series and different textures, so as to obtain a perfect visual layering effect.

Source: Internet

As shown below, any combination of clothing items from the same color series but using different textures, such as beige turtlenecks, beige shirts, beige sweaters, beige wide-leg pants, and beige coats, will give you a simple and elegant set that shows off your sophistication. A classy late-winter workplace layering look!

Picture source: "" (January 2022 issue); "" (January February 2022 issue); "" (January February 2022 issue)

Thank you for the above~~~~ No matter what kind of difficult dressing problem you encounter, you can tell Mr. Lizi. Who knows, the topic of the next article will be it?